0%

Flask源码之从WSGI协议说起(一)

引言

我们知道web应用的本质就是:

  1. 浏览器发送一个HTTP请求
  2. 服务器收到请求,处理业务逻辑,生成html、json等数据
  3. 服务器把html、json等数据放在HTTP响应的body中发送给浏览器
  4. 浏览器收到http响应

可以看到这一过程我们需要接受、解析HTTP请求和发送HTTP响应,如果这些都由我们自己来写的话,我们需要自己处理包括建立TCP连接(HTTP协议是建立在TCP之上)、解析原始HTTP请求等工作,这太麻烦了。所以我们需要:

  1. 一个HTTP服务器软件帮我们处理这些工作
  2. Web应用框架专注于处理业务逻辑

而WSGI就是约定HTTP服务器软件和Web应用框架交互的协议

WSGI协议

WSGI协议主要包括两部分,服务端和应用框架端

具体来说,服务端就是HTTP服务器把HTTP原始请求(字节形式)封装成一个dict对象,调用应用框架的如下函数application,dict对象传给environ参数,并提供一个start_response回调函数。

应用框架处理完业务逻辑之后,回过头来调用start_response这个函数让HTTP服务器软件发送HTTP响应给浏览器

1
2
3
def application(environ, start_response):
start_response('200 OK', [('Content-Type', 'text/html')])
return [b'<h1>Hello, web!</h1>']

img

Gunicon

gunicorn是一个用python写的实现了WSGI协议的HTTP Server,也就是HTTP服务器

我们来看一下它是如何启动我们的项目的

1
2
3
4
# 创建虚拟环境
virtualenv --python=python3 venv
# 安装gunicorn
pip install gunicorn
1
2
3
4
5
# 查看我们的应用代码
cat myapp.py
def application(environ, start_response):
start_response('200 OK', [('Content-Type', 'text/html')])
return [b'<h1>Hello, web!</h1>']
1
2
3
4
5
6
7
8
9
10
11
12
13
# 这行命令的意思是gunicorn从myapp这个模块中导入application这个对象
# 相当于 from myapp import application
# 然后开启四个worker来处理浏览器发送过来的http请求
# 要注意的是,进程不共享内存,所以每个worker都实例化了一个application对象,这在有些场景下或许是一个问题
gunicorn -w 4 myapp:application

[2020-12-22 07:03:22 -0800] [50121] [INFO] Starting gunicorn 20.0.4
[2020-12-22 07:03:22 -0800] [50121] [INFO] Listening at: http://127.0.0.1:8000 (50121)
[2020-12-22 07:03:22 -0800] [50121] [INFO] Using worker: sync
[2020-12-22 07:03:22 -0800] [50124] [INFO] Booting worker with pid: 50124
[2020-12-22 07:03:22 -0800] [50125] [INFO] Booting worker with pid: 50125
[2020-12-22 07:03:22 -0800] [50126] [INFO] Booting worker with pid: 50126
[2020-12-22 07:03:22 -0800] [50127] [INFO] Booting worker with pid: 50127

也就是任何python web框架只要实现了这个application函数或者有实现了__call__方法的对象,就可以了就可以被gunicorn调用,一定程度上起到了解耦的作用

1
2
3
4
class Application(object):
def __call__(environ,start_response):
start_response('200 OK', [('Content-Type', 'text/html')])
return [b'<h1>Hello, web!</h1>']

我们自己来实现HTTP 服务器软件或者叫WSGI Server呢?

代码有点长,建议在电脑上慢慢看,逻辑很简单

  1. 创建socket对象
  2. 开启一个循环,从socket对象中不停接受客户端的连接
  3. 连接建立了就开始接收数据(字节),把数据封装成environ对象(dict)
  4. 调用应用框架的application函数,传入envirionstart_response参数

vim my_wsgi_server.py

1
2
3
4
5
6
7
8
9
10
11
12
13
14
15
16
17
18
19
20
21
22
23
24
25
26
27
28
29
30
31
32
33
34
35
36
37
38
39
40
41
42
43
44
45
46
47
48
49
50
51
52
53
54
55
56
57
58
59
60
61
62
63
64
65
66
67
68
69
70
71
72
73
74
75
76
77
78
79
80
81
82
83
84
85
86
87
88
89
90
91
92
93
94
95
96
97
98
99
100
101
102
103
104
105
106
107
108
109
110
111
112
113
114
115
116
117
118
119
120
121
122
123
124
125
126
127
128
129
130
131
132
133
134
135
136
137
138
139
140
141
142
143
144
145
146
# -*- coding: UTF-8 -*-
import io
import socket
import sys


class WSGIServer(object):
address_family = socket.AF_INET
socket_type = socket.SOCK_STREAM
request_queue_size = 1

def __init__(self, server_address):
# Create a listening socket
self.listen_socket = listen_socket = socket.socket(
self.address_family,
self.socket_type
)
# Allow to reuse the same address
listen_socket.setsockopt(socket.SOL_SOCKET, socket.SO_REUSEADDR, 1)
# Bind
listen_socket.bind(server_address)
# Activate
listen_socket.listen(self.request_queue_size)
# Get server host name and port
host, port = self.listen_socket.getsockname()[:2]
self.server_name = socket.getfqdn(host)
self.server_port = port
# Return headers set by Web framework/Web application
self.headers_set = []

def set_app(self, application):
self.application = application

def serve_forever(self):
listen_socket = self.listen_socket
while True:
# 轮询获取客户端的TCP连接
self.client_connection, client_address = listen_socket.accept()
# 处理一个HTTP请求,然后关闭
self.handle_one_request()

def handle_one_request(self):
request_data = self.client_connection.recv(1024)
self.request_data = request_data = request_data.decode('utf-8')
# Print formatted request data a la 'curl -v'
print(''.join(
f'< {line}\n' for line in request_data.splitlines()
))

self.parse_request(request_data)

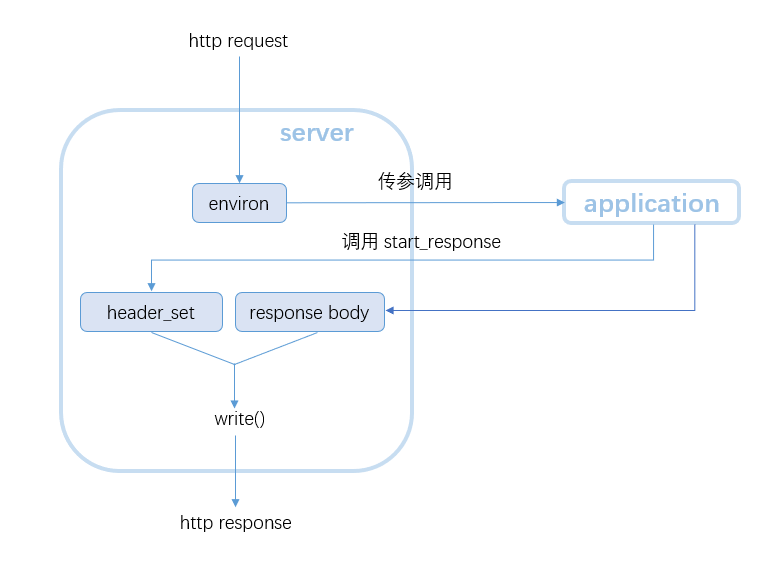
# 把原始的HTTP请求变成dict字典
env = self.get_environ()

# 这里就是WSGI协议部分
# 传入包含请求信息的dict对象和回调函数start_response
result = self.application(env, self.start_response)

# Construct a response and send it back to the client
self.finish_response(result)

def parse_request(self, text):
request_line = text.splitlines()[0]
request_line = request_line.rstrip('\r\n')
# Break down the request line into components
(self.request_method, # GET
self.path, # /hello
self.request_version # HTTP/1.1
) = request_line.split()

def get_environ(self):
env = {}
# The following code snippet does not follow PEP8 conventions
# but it's formatted the way it is for demonstration purposes
# to emphasize the required variables and their values
#
# Required WSGI variables
env['wsgi.version'] = (1, 0)
env['wsgi.url_scheme'] = 'http'
env['wsgi.input'] = io.StringIO(self.request_data)
env['wsgi.errors'] = sys.stderr
env['wsgi.multithread'] = False
env['wsgi.multiprocess'] = False
env['wsgi.run_once'] = False
# Required CGI variables
env['REQUEST_METHOD'] = self.request_method # GET
env['PATH_INFO'] = self.path # /hello
env['SERVER_NAME'] = self.server_name # localhost
env['SERVER_PORT'] = str(self.server_port) # 8888
return env

def start_response(self, status, response_headers, exc_info=None):
# Add necessary server headers
server_headers = [
('Date', 'Mon, 15 Jul 2019 5:54:48 GMT'),
('Server', 'WSGIServer 0.2'),
]
self.headers_set = [status, response_headers + server_headers]
# To adhere to WSGI specification the start_response must return
# a 'write' callable. We simplicity's sake we'll ignore that detail
# for now.
# return self.finish_response

def finish_response(self, result):
try:
status, response_headers = self.headers_set
response = f'HTTP/1.1 {status}\r\n'
for header in response_headers:
response += '{0}: {1}\r\n'.format(*header)
response += '\r\n'
for data in result:
response += data.decode('utf-8')
# Print formatted response data a la 'curl -v'
print(''.join(
f'> {line}\n' for line in response.splitlines()
))
response_bytes = response.encode()
self.client_connection.sendall(response_bytes)
finally:
self.client_connection.close()


SERVER_ADDRESS = (HOST, PORT) = '', 8888


def make_server(server_address, application):
server = WSGIServer(server_address)
server.set_app(application)
return server


if __name__ == '__main__':
if len(sys.argv) < 2:
sys.exit('Provide a WSGI application object as module:callable')
# 获取python my_wsgi_server.py后面的第一个参数
app_path = sys.argv[1]
module, application = app_path.split(':')
# myapp
module = __import__(module)
# myapp.application
application = getattr(module, application)
# 创建http服务器
httpd = make_server(SERVER_ADDRESS, application)
print(f'WSGIServer: Serving HTTP on port {PORT} ...\n')

httpd.serve_forever()

我们用自己写的wsgi server调用自己写的application,也就是应用框架

python3 my_wsgi_server.py myapp:application

至此,你就成功用自己写的wsgi server运行了自己的应用代码

你还可以尝试用这个wsgi server运行flask

pip3 install flask

vim flask_app

1
2
3
4
5
6
7
8
9
10
from flask import Flask

flask_app = Flask(__name__)


@flask_app.route('/')
def hello_world():
return "hello flask"

# python3 my_wsgi_server.py flask_app:flask_app

python3 my_wsgi_server.py flask_app:flask_app

访问8888端口

1
2
3
4
5
6
git clone git@github.com:johnson329/flask_src.git
git checkout 6723f55
virtualenv --python=python3 venv
source venv/bin/activate
pip3 install -r requirements.txt
python3 my_wsgi_server.py flask_app:flask_app

参考

Let’s Build A Web Server. Part 1.

Let’s Build A Web Server. Part 2.

pep-3333