0%

Flask源码之请求上下文和应用上下文(三)

原理

Request

Flask把前端传过来的数据environ封装成了 flask.wrappers.Request

这个类的实例又是RequestContextrequest属性值

1
2
class RequestContext(object):
request=flask.wrappers.Request(environ)

当然实际的代码是这样

1
2
class RequestContext(object):
request=app.request_class(environ)

这个app.request_class= flask.wrappers.Request

之所以这样写,是为了扩展性,你可以修改Flaskrequest_class属性来自定义你的Request

1
2
3
4
5
6
7
8
9
10
11
12
from flask import g, request

def get_tenant_from_request():
auth = validate_auth(request.headers.get('Authorization'))
return Tenant.query.get(auth.tenant_id)

def get_current_tenant():
rv = getattr(g, 'current_tenant', None)
if rv is = None:
rv = get_tenant_from_request()
g.current_tenant = rv
return rv

例如

1
2
3
4
5
6
import flask
class MyFlask(flask.Flask):
request_class=MyRequest

class MyRequest(flask.wrappers.Request):
pass

继续来看RequestContext,这个类在源码中实例化了

1
ctx=RequestContext(self,envirion)

所以,也就是说以后我们只要拿到这个实例ctx,然后访问ctx.request就相当于访问flask.wrappers.Request了,也就相当于可以访问envirion,,而RequestContext就是请求上下文。

ctx存储在哪里呢?怎么访问呢?

RequestContext

存储

实际上,ctx存在栈结构中,也就是后进先出,这是为了处理一个客户端请求需要多个ctx的情况

用伪代码表示就是

1
stack=[RequestContext(),RequestContext()]

而且,我们知道有的wsgi server对于每个请求都开一个线程,因此为了处理多线程隔离的情况,这个栈结构又存在了local中,这个local数据结构类似ThreadLocal,他们共同组成了LocalStack

用伪代码表示就是

1
localstack={0:{"stack":stack}} # 0是线程id或者协程id

访问

访问ctx.request也不是直接访问的,是通过一个代理类,叫LocalProxy,他是代理模式在flask中的应用

具体来说你要访问 ctx.request 的某个属性,先访问LocalProxy的对应属性,LocalProxy帮你访问

LocalProxy代理了对 ctx.request的所有操作

伪代码就是

1
2
3
4
5
6
7
8
# 例如flask.wrapper.Request()有一个get_json()方法
# localproxy也实现这个方法,帮我们访问
class LocalProxy(object):
def get_json(self):
# 从localstack中获取请求上下文
ctx:RequestContext=local["这次请求的线程id"]["stack"].top
json_data=ctx.request.get_json()
return json_data

当然这个例子是不真实的,如果对于每个 flask.wrapper.Request的方法我们都在 LocalProxy实现一遍,那太麻烦了

request

我们经常会引用这个request对象,它实际上就是LocalProxy的实例,位置在flask.globals.py

1
from flask import request
1
request = LocalProxy(partial(_lookup_req_object, "request"))

他代理了对 RequestContext.request也就是flask.wrappers.Request实例的操作

current_appg则分别代理了对AppContext.app(也就是flask实例)和 AppContext.g的操作

实现

Stack

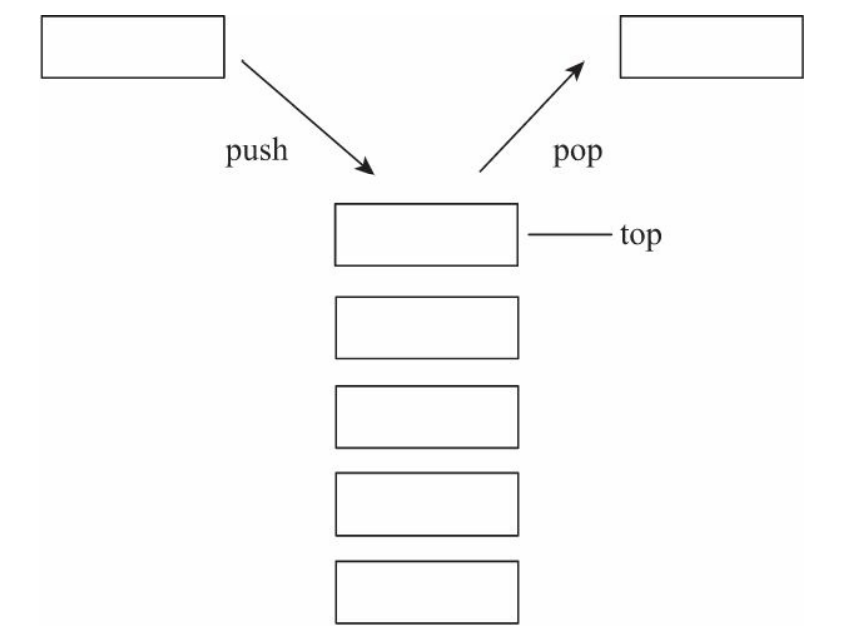
一个栈结构,一般要实现 push,top,pop这几个方法

1
2
3
4
5
6
7
8
9
10
11
12
13
14
15
class Stack(object):
def __init__(self):
self.items = []

def push(self, item):
self.items.append(item)

def is_empty(self):
return self.items == []

def pop(self):
if self.is_empty():
return None
# 后进先出
return self.items[-1]
![image-20210123001932225](https://i.loli.net/2021/01/23/fast1ebwznp45Ol.png)

Local

local源码,作用就是线程或者协程隔离

1
2
3
4
5
6
7
8
9
10
11
12
13
14
15
16
17
18
19
20
21
22
23
24
25
26
27
28
29
30
31
32
33
34
35
36
37
38
39
40
41
42
43
44
class Local(object):
__slots__ = ("__storage__", "__ident_func__")

def __init__(self):
# 实例化的时候给self绑定__storage__属性,初始值是{}
object.__setattr__(self, "__storage__", {})
# 实例化的时候给self绑__ident_func__属性,初始值是get_ident函数,这个方法用于获取当前线程或协程id
object.__setattr__(self, "__ident_func__", get_ident)

def __setattr__(self, name, value):
# 这个方法会在属性被设置时调用
# 因此如果我们这样操作
# s=Stack()
# s.a=1
# 那么self.__storage__属性就变成了 {0:{"a",1}},0表示当前线程id
ident = self.__ident_func__()
storage = self.__storage__
try:
storage[ident][name] = value
except KeyError:
storage[ident] = {name: value}

def __getattr__(self, name):
# 获取属性时,该方法会被调用
# 容易看出,通过把线程或协程id设置为key,可以实现线程或写成隔离
try:
return self.__storage__[self.__ident_func__()][name]
except KeyError:
raise AttributeError(name)

def __iter__(self):
# 迭代的时候会被调用
return iter(self.__storage__.items())

def __release_local__(self):
# 清空当前线程的堆栈数据
self.__storage__.pop(self.__ident_func__(), None)

def __delattr__(self, name):
# 删除属性时候会被调用
try:
del self.__storage__[self.__ident_func__()][name]
except KeyError:
raise AttributeError(name)

LocalStack

LocalStack大概相当于

1
{0:{"stack":[ctx,]}}
1
2
3
4
5
6
7
8
9
10
11
12
13
14
15
16
17
18
19
20
21
22
23
24
25
26
27
28
29
30
31
32
33
34
35
36
37
38
39
40
41
42
43
44
45
46
47
48
49
50
51
class LocalStack(object):

def __init__(self):
# _local属性是Local对象,相当于字典{}
# push方法就是给_local实例添加一个stack属性,初始值是[],然后append
# {0:'stack':[]}
self._local = Local()

def __release_local__(self):
self._local.__release_local__()

@property
def __ident_func__(self):
return self._local.__ident_func__

@__ident_func__.setter
def __ident_func__(self, value):
object.__setattr__(self._local, "__ident_func__", value)

def push(self, obj):
rv = getattr(self._local, "stack", None)
if rv is None:
self._local.stack = rv = []
rv.append(obj)
return rv

def pop(self):
stack = getattr(self._local, "stack", None)
if stack is None:
return None
elif len(stack) == 1:
release_local(self._local)
return stack[-1]
else:
return stack.pop()

@property
def top(self):
try:
return self._local.stack[-1]
except (AttributeError, IndexError):
return None

def __call__(self):
def _lookup():
rv = self.top
if rv is None:
raise RuntimeError("object unbound")
return rv

return LocalProxy(_lookup)

值得注意的是,当我们执行如下代码

1
2
ls=LocalStack()
ls()

会调用 __call__方法,返回的是目前栈顶对象的代理对象,栈顶对象例如RequestContext

LocalProxy

LocalProxy就是代理对象了,它可以代理对RequestContext的操作

1
2
3
4
5
6
7
8
9
10
11
12
class LocalProxy(object):
__slots__ = ("__local", "__dict__", "__name__", "__wrapped__")
def __init__(self, local, name=None):
object.__setattr__(self, "_LocalProxy__local", local)


def _get_current_object(self):
if not hasattr(self.__local, "__release_local__"):
return self.__local()

def __getattr__(self, name):
return getattr(self._get_current_object(), name)

原理很简单,我们访问 LocalProxy的某个属性,会调用 __getattr__方法,__getattr__方法又会调用 _get_current_object去获取栈顶对象或者栈顶对象的属性,例如获取RequestContext对象或者RequestContext.request

request对象为例

他是一个LocalProxy的实例

1
request = LocalProxy(partial(_lookup_req_object, "request"))

LocalProxy实例化传入了一个偏函数 _lookup_req_object(偏函数作用就是固定函数的参数),这个函数的作用就是获取栈顶的RequestContext对象的request属性,也就是 flask.wrappers.Request()

1
2
3
4
5
def _lookup_req_object(name):
top = _request_ctx_stack.top
if top is None:
raise RuntimeError(_request_ctx_err_msg)
return getattr(top, name)

也就是说 LocalProxy__local就是 partial(_lookup_req_object, "request")

那么 _get_current_object实际上就是执行 partial(_lookup_req_object, "request")()来获取栈顶对象

入栈

我们继续来看wsgi_app这个方法,我去掉了一些无关代码,那些部分会在其他博文中介绍

1
2
3
4
def wsgi_app(self, environ, start_response):
# 调用了self.request_context这个方法
# 此方法把environ封装成了RequestContext对象
ctx = self.request_context(environ)
1
2
3
4
def request_context(self, environ):
# 注意request_context是Flask的类方法,那么self就是Flask的实例或者说对象
# 也就是说下面的 RequestContext 的实例化需要Flask实例和environ参数
return RequestContext(self, environ)

简单看一下RequestContext的定义,位置在源码的ctx.py

1
2
3
4
5
6
class RequestContext(object):
def __init__(self, app, environ, request=None, session=None):
self.app = app
if request is None:
request = app.request_class(environ)
self.request = request

回到wsgi_app这个方法,我们看到接下来ctx.push这一句调用了RequestContextpush方法,这个方法就是把自身也就是 RequestContext实例压入到 LocalStack这个数据结构中

1
2
3
4
5
6
7
8
9
10
11
12
13
14
15
16
17
18
19
20
def wsgi_app(self, environ, start_response):
# ctx是 RequestContext 实例
ctx = self.request_context(environ)
error = None
try:
try:
# 只看这一句
ctx.push()
response = self.full_dispatch_request()
except Exception as e:
error = e
response = self.handle_exception(e)
except: # noqa: B001
error = sys.exc_info()[1]
raise
return response(environ, start_response)
finally:
if self.should_ignore_error(error):
error = None
ctx.auto_pop(error)

push方法

1
2
def push(self):
top = _request_ctx_stack.top

_request_ctx_stack的定义在globals.py中,就是创建了一个空的本地栈

1
_request_ctx_stack = LocalStack()

它现在的状态是这样,栈是空的

1
{0:'stack':[]}

如果栈是空的话,我们把self也就是RequestContext压入栈(最后一句),注意pushRequestContext的方法,所以self就是RequestContext的实例

1
2
3
4
5
6
7
8
9
10
11
12
13
14
def push(self):
top = _request_ctx_stack.top

app_ctx = _app_ctx_stack.top
if app_ctx is None or app_ctx.app != self.app:
app_ctx = self.app.app_context()
app_ctx.push()
self._implicit_app_ctx_stack.append(app_ctx)
else:
self._implicit_app_ctx_stack.append(None)


# 压入栈
_request_ctx_stack.push(self)

我们还注意到这里还有一个_app_ctx_stack,这也是LocalStack,位置在globals.py,他现在也是空的

1
_app_ctx_stack = LocalStack()

只不过这个栈里面存储的是应用上下文,类似下面的字典

1
{0:'stack':[AppContext]}

然后我们也执行了app_ctx.push()方法,也就是把应用上下文压入栈

到这里我们就知道了,执行RequestContext对象的push方法会把RequestContext的实例压入_request_ctx_stack中,还会把AppContext的实例压入_app_ctx_stack

为什么要用LocalProxy

我们常常需要在一个视图函数中获取客户端请求中的参数,例如urlremote_address

我们当然可以每次手动获取_request_ctx_stack栈顶的RequestContext对象,然后调用RequestContextrequest属性,但每次操作栈结构还是有点繁琐,像下面这样

1
2
3
4
5
6
7
8
9
10
11
from flask import Flask, request, Request
from flask.globals import _request_ctx_stack

flask_app = Flask(__name__)


@flask_app.route('/')
def hello_world():
req: Request = _request_ctx_stack.top.request
remote_addr=req.remote_addr
return "{}".format(remote_addr)

flask的做法是使用LocalProxy

1
from flask import Flask, request

我们执行request.remote_addr就相当于执行 _request_ctx_stack.top.request.remote_addr

那为什么用LocalProxy而不是直接request=_request_ctx_stack.top.request呢?

原因是这样写,项目run的时候,这句 request=_request_ctx_stack.top.request 就已经执行了(因为被引用了),但是项目启动的时候_request_ctx_stack.top还是None,因为还没有请求进来,push方法还没执行。这就导致了request固定成了None,这显然不行

LocalProxy 重写了__getattr__方法,让每次执行 request.remote_addr会先去 LocalStack中拿到 RequestContext,然后执行 RequestContext.request.remote_addr,获取其他属性也是一样

也就是说,代理模式延迟了 被代理对象的获取,代理对象Localproxy创建的时候不会获取,获取被代理对象属性的时候才会获取被代理对象

总结

到这里,我们就可以看出flask中的请求上下文是如何存储和获取的

请求上下文存储在LocalStack结构中,Local是为了线程安全,LocalStack是为了多请求上下文的场景

而获取是通过LocalProxy,使用代理模式是为了动态地获取请求上下文,在访问request属性的时候,才会从栈中获取真实的请求上下文,然后代理 属性的获取

flask中还有应用上下文,current_app,我们有时候会通过current_app.config来获取配置信息,原理和request类似,只不过代理的是AppContext对象

说了这么多,wsgi_app的第一步,也就是请求的第一步,就是先把请求上下文和应用上下文入栈